Car AC Compressor Not Cycling Off – 4 Causes Explained!
When the relentless summer heat sets in, a properly functioning car air conditioning system is critical. The AC compressor circulates the refrigerant throughout the AC system. However, if you find yourself in a situation where the AC compressor refuses to cycle off, it can make your drive very unpleasant.
So, why is my car’s AC compressor not cycling off?
This issue can be attributed to four main factors, including Faulty compressor & clutch, Thermostat malfunction and Low refrigerant.
Continue reading to learn more about the most common causes of why your AC compressor is not cycling off. We will also provide practical solutions to these issues to ensure your vehicle’s cooling system operates seamlessly.
Causes Of Car AC Compressor Not Cycling Off
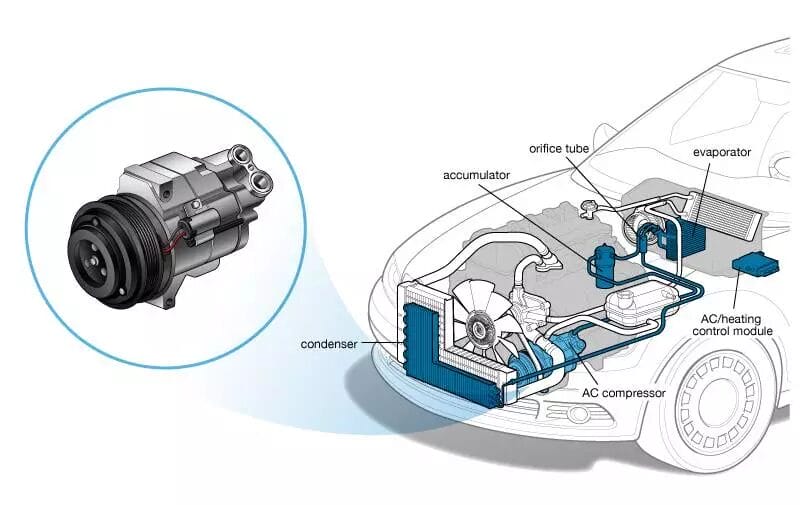
A car AC (air conditioning) compressor’s primary function is to compress and circulate refrigerant gas within the system to remove heat from the passenger compartment. The compressor maintains the desired temperature inside the car by pressurizing the refrigerant.
It then causes the refrigerant to release heat as it changes from a gas to a liquid and vice versa. When working properly, the compressor cycles on and off to maintain the desired temperature inside the vehicle.
However, if the compressor fails to cycle off as intended, it causes a chain of problems. Continuous operation increases fuel consumption, potential damage to other components, and an unpleasant interior climate.
Let us discuss the reasons why your compressor is not cycling off.
A Faulty Compressor
The most common reason for this issue is a malfunctioning compressor. Wear and tear on internal components such as pistons, valves, or bearings leads to mechanical failure over time.
Also, inadequate lubrication, often caused by low refrigerant levels or degraded oil, exacerbates wear. External factors, such as electrical malfunctions or excessive system pressure, can also contribute to compressor issues.
Diagnosis
- Examine the AC compressor, clutch, and connections for visible signs of damage, leaks, or unusual wear. You may notice unusual noises emanating from the compressor area, such as clanking or grinding. This indicates internal mechanical problems with the compressor.
Solution
- Use a refrigerant recovery machine to safely remove the refrigerant from the AC system.
- Disconnect the refrigerant lines from the compressor using a wrench or socket set.
- Remove the bolts that hold the compressor to the engine block. Remove the faulty compressor with caution.
- Use the manufacturer’s recommended amount of AC compressor oil to fill the new compressor.
- Tighten the mounting bolts to secure the new compressor. Reconnect the refrigerant lines.
- Remove air and moisture from the AC system with a vacuum pump. After vacuuming, recharge the system with the appropriate amount of refrigerant.
Faulty Compressor Clutch
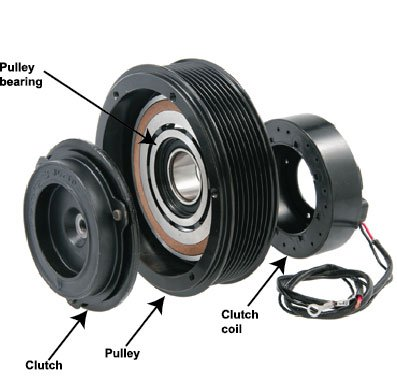
The compressor clutch engages and disengages the compressor. When engaged, the compressor operates, and when disengaged, it stops. This on-off cycling is vital for maintaining the desired temperature in the car’s cabin.
If the compressor clutch fails to disengage properly, the compressor will remain continuously engaged even when the air conditioning system is turned off.
This can cause constant compression of the refrigerant, resulting in overcooling or freezing of the evaporator. This, in turn, affects the overall performance of the AC system.
Diagnosis
To assess the condition of the AC compressor clutch, follow these steps:
- Visual Inspection: Identify the location of the AC compressor in the engine bay. The compressor is usually connected to the engine with a belt and has a pulley on the front. This pulley houses the clutch assembly. Examine the clutch for signs of wear.
- Manual Engagement Test: With the engine off, attempt to rotate the front of the compressor by hand. If there is resistance, it indicates that the clutch is engaged. If it spins freely, the clutch is disengaged.
- Voltage Testing: Using a multimeter, measure the voltage at the clutch connector when the AC is turned on and off. The voltage should range from 12-15 volts, depending on your car’s model. If it is less than that, there is an issue with the clutch operation.
Solution
- Clutch Adjustment: In some cases, adjusting the air gap between the clutch and the pulley may resolve engagement issues. This adjustment ensures proper contact and disengagement when necessary.
- Clutch Replacement: Replacement is frequently the most effective solution if the clutch is severely damaged or worn out. Replacing a compressor clutch is a difficult task requiring a certain level of automotive knowledge and expertise. Here is a video showing how to go about it.
Thermostat Malfunction
The thermostat in your car’s air conditioning system acts as a temperature regulator, determining when the compressor should engage or disengage. When a thermostat fails, it can misinterpret temperature signals, causing the AC compressor to run longer than necessary.
Diagnosis
- Test Resistance: Use a multimeter to test the resistance of the thermostat. The specified resistance is 24V. Deviations from this range indicate a faulty thermostat.
- Check for Calibration: Some thermostats allow for calibration adjustments. Refer to your vehicle’s manual to see if your thermostat is adjustable. If so, follow the calibration instructions to ensure accurate temperature readings.
Solution
If the thermostat is beyond repair, replacement is the only option. This is how you do it.
- If the thermostat is submerged in coolant, drain a small amount to prevent spillage when removing the housing.
- Use a socket set to loosen and remove the bolts that secure the thermostat housing. Lift the housing carefully to expose the thermostat once it has been detached.
- Disconnect the wires from the old thermostat with care. If the thermostat is attached to a bracket, remove it with pliers.
- Clean the housing before installing the new thermostat to remove any debris or residue.
- Insert the new thermostat into the housing, making sure it is correctly aligned with the orientation noted during removal.
- Reconnect the wires to the new thermostat as documented or photographed earlier.
- Return the thermostat housing to its original location and secure it by tightening the bolts with the socket set.
Low Refrigerant
The refrigerant is the AC system’s lifeblood. It is responsible for absorbing and releasing heat to ensure effective cooling. If the refrigerant is low, it leads to the compressor not running continuously to maintain the desired pressure.
The most common cause of refrigerant leaks is wear and tear on components such as refrigerant lines, O-rings, and evaporator coils.
Diagnosis
- Begin by visually inspecting the air conditioning system components for visible signs of refrigerant leaks. Look for oily residue near fittings, connectors, or the compressor, as this could indicate a leak.
Note: Refer to your vehicle’s manual to identify the location of the evaporator or condenser coils.
- To check the refrigerant levels in the system, use an AC pressure gauge. When the pressure falls below the recommended range, it indicates that the refrigerant levels are low.
A general guideline for a typical automotive air conditioning system using R134a refrigerant is as follows:
Low-Side Pressure:
- At idle: Approximately 25 to 40 psi
- At 1,500 RPM or higher: Approximately 30 to 45 psi
High-Side Pressure:
- At idle: Approximately 150 to 250 psi
- At 1,500 RPM or higher: Approximately 200 to 350 psi
Solution
If leaks are detected during the visual inspection, promptly replace the damaged components. This is how to do it:
- Access the coils by removing any necessary panels or covers. This involves removing the glove compartment, dashboard components, or the grille in front of the radiator.
- Gently extract the old evaporator or condenser coils from their housing.
- Place the new evaporator or condenser coils into the designated housing, ensuring they are properly positioned and secured.
- Recharge the AC system with the proper amount of refrigerant.
- Reassemble any access panels or covers that were removed earlier.
FAQs
Here are other related questions: “Car AC compressor not cycling off.”

Can a dirty air filter cause an AC compressor not to cycle off?
A dirty air filter reduces airflow, forcing the compressor to continue to cycle to provide adequate cooling for the car. Replace the air filter regularly to ensure uninterrupted airflow and allow the compressor to cycle on and off as needed for optimal cooling.
How long does an AC compressor last?
On average, a well-maintained AC compressor can last anywhere from 10 to 15 years. However, certain factors, such as usage, maintenance, and environmental conditions, can influence the compressor’s longevity.
Can I continue driving if my AC compressor is not cycling off?
While you can continue driving, prolonged operation results in increased fuel consumption and potential AC system damage. It is best to address the problem as soon as possible.
Closing Words
A non-stop AC compressor can be inconvenient. This article has provided an overview of the various causes of a constantly running AC compressor. There are also detailed, step-by-step troubleshooting procedures for each problem.
Common causes of cycle problems include refrigerant leaks, thermostat malfunctions, worn coils, and a faulty compressor clutch. Diagnosis of these issues necessitates careful observation and maintenance checks.
Regular maintenance, clean air filters, and addressing issues as soon as they arise can help reduce compressor cycling issues. This also extends the life of the air conditioning system. After that, you should have a consistently cool and comfortable living vehicle during the hot months.